RD Works: Difference between revisions
en>Gamebofh (add images) |
en>Gamebofh (organize) |
||
| Line 3: | Line 3: | ||
=Getting started= | =Getting started= | ||
== Open and import == | |||
Open RD Works and import your design using the menu (File | Import) | Open RD Works and import your design using the menu (File | Import) | ||
== Check dimensions == | |||
Check that your dimensions are correct. See the transform tab (2) at the right of the screen. The icon (2) for scale is second from the right. | Check that your dimensions are correct. See the transform tab (2) at the right of the screen. The icon (2) for scale is second from the right. | ||
[[File:rdworks-1.png|250px]] | [[File:rdworks-1.png|250px]] | ||
== Set your layer, power & speed == | |||
Back on the work tab set the speed and power for your layers and be sure that on your layers it has output set to Yes | Back on the work tab set the speed and power for your layers and be sure that on your layers it has output set to Yes | ||
| Line 13: | Line 18: | ||
Remember that in RD Works Scan = engrave | Remember that in RD Works Scan = engrave | ||
== Simulate! == | |||
Simulate your cut to be sure things look correct | Simulate your cut to be sure things look correct | ||
| Line 18: | Line 24: | ||
The icon for simulate is at the top of the screen and looks like a monitor. | The icon for simulate is at the top of the screen and looks like a monitor. | ||
== Download file to the laser == | |||
Download the design to the machine. The download button is in the right side 2/3 down the window. | Download the design to the machine. The download button is in the right side 2/3 down the window. | ||
| Line 34: | Line 42: | ||
[[File:rdworks5.png|250px]] | [[File:rdworks5.png|250px]] | ||
== Move the laser == | |||
After downloading use the arrow keys on the control panel move the laser to a good starting point. | After downloading use the arrow keys on the control panel move the laser to a good starting point. | ||
== Set the origin == | |||
Press the origin key to set the starting point for the cut. | Press the origin key to set the starting point for the cut. | ||
== Check the cut path == | |||
Press the frame button to see where the cut will go. Much like Run Box from [[LaserCut 5.3]] | Press the frame button to see where the cut will go. Much like Run Box from [[LaserCut 5.3]] | ||
Revision as of 01:35, 26 June 2020
This is the software that comes with the PewPew4500. Eric had started documenting it, so I'm going to translate that over to here.
Getting started
Open and import
Open RD Works and import your design using the menu (File | Import)
Check dimensions
Check that your dimensions are correct. See the transform tab (2) at the right of the screen. The icon (2) for scale is second from the right.
Set your layer, power & speed
Back on the work tab set the speed and power for your layers and be sure that on your layers it has output set to Yes
Remember that in RD Works Scan = engrave
Simulate!
Simulate your cut to be sure things look correct
The icon for simulate is at the top of the screen and looks like a monitor.
Download file to the laser
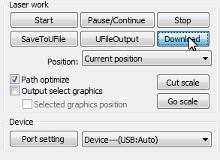
Download the design to the machine. The download button is in the right side 2/3 down the window.
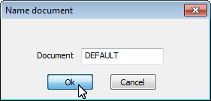
Keep DEFAULT as the file name. It's short enough and doesn't have any forbidden characters.
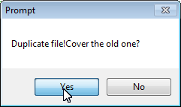
Prompt! Duplicate File!Cover old one? Click Yes.
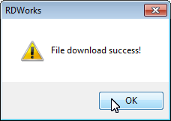
RDWorks File download success! In this case the exclamation icon is a good thing.
Move the laser
After downloading use the arrow keys on the control panel move the laser to a good starting point.
Set the origin
Press the origin key to set the starting point for the cut.
Check the cut path
Press the frame button to see where the cut will go. Much like Run Box from LaserCut 5.3
This will make send the laser on a rectangular path around all the parts in your design without cutting anything.


