WoodShop Basic Table Saw Class: Difference between revisions
Jump to navigation
Jump to search
| Line 41: | Line 41: | ||
== Ripping == | == Ripping == | ||
* Material max size 2' x 4' | * Material max size 2' x 4'. | ||
* Verify the blade is square to the table. | * Verify the blade is square to the table. | ||
* Rip fence basics. | * Rip fence basics. | ||
Revision as of 19:44, 14 September 2022
Overview
In this class (currently in development, not yet offered), you will learn:
- Safety
- Care & Cleaning
- Setup & Teardown
- Rip Cuts
- Dados
- Crosscuts
- Bevel Cuts
- Miter Cuts
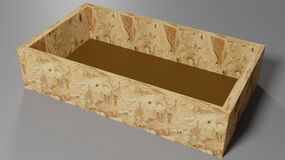
The end result is an open top box that can be used for organizing things, but also acts as the bottom portion of an arcade control. A series of classes in different disciplines will complete the rest of the arcade control.
Safety
Care & Cleaning
Setup & Teardown
Project
Final Product
13.5" x 7.5" x 3" box with bottom
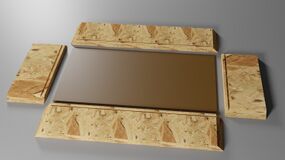
Cut List
- 1/2" OSB
- 2@ 7.5" x 3" with 45 degree bevels, rough side in, and a .14 x .14 dado .125 from the bottom edge
- 2@ 13.5" x 3" with 45 degree bevels, rough side in, and a .14 x .14 dado .125 from the bottom edge
- 1/8" hardboard
- 1@ 6.75" x 12.75"
Ripping
- Material max size 2' x 4'.
- Verify the blade is square to the table.
- Rip fence basics.
- Verify the rip fence is parallel to the blade.
- Adjust squareness.
- Set the width of cut.
- Set the depth of cut.
- Think through the cut.
- Can you reach the kill switch with your knee?
- Where are your hands?
- Where is the blade?
- Where will the material go when the cut completes?
- Keep the material tight and square to the fence.
- Move smoothly through the cut.
- Stop if things sound or look wrong.
- Hit the kill switch with your knee if anything seems unsafe.
- Wood and saws are cheap compared to fingers.
Dadoing
Crosscutting
Beveling
Mitering
I haven't figured out how to shoehorn a miter cut into this project, but we'll do one anyway, so you know how to use the miter gauge.

