Mini 60W Laser: Difference between revisions
en>Nate Caine No edit summary |
en>Eric Ose |
||
| Line 1: | Line 1: | ||
= Overview = | = Overview = | ||
This is the main quick guide for the '''Mini 60W Laser''' | This is the main quick guide for the '''Mini 60W Laser'''. See the [[Laser_Cutters | Laser Cutters]] page for more laser cutter information. | ||
== What you can cut == | == What you can cut == | ||
Revision as of 04:09, 11 August 2023
Overview
This is the main quick guide for the Mini 60W Laser. See the Laser Cutters page for more laser cutter information.
What you can cut
These lists are not exhaustive. If your material is not on either list, ask first!
- See the Laser Material Guidelines for a list of materials and common speed and power settings.
Lightburn Software
https://lightburnsoftware.github.io/NewDocs/index.html
Size
Bed dimensions are are approximately 70 cm x 50 cm
Turn on the laser
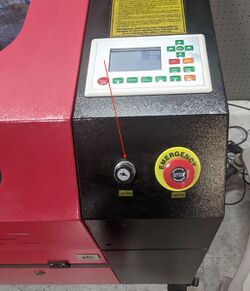
If you look at the machine, you'll see the key slot right on the front.
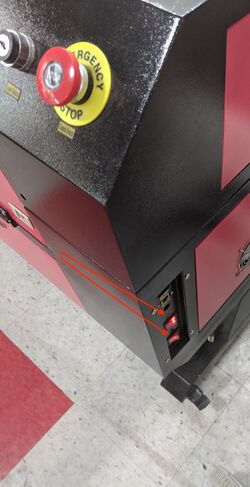
Yeah, you're going to ignore that. The switches on the side are where you actually need to turn it on. Get both of them.
Load the laser
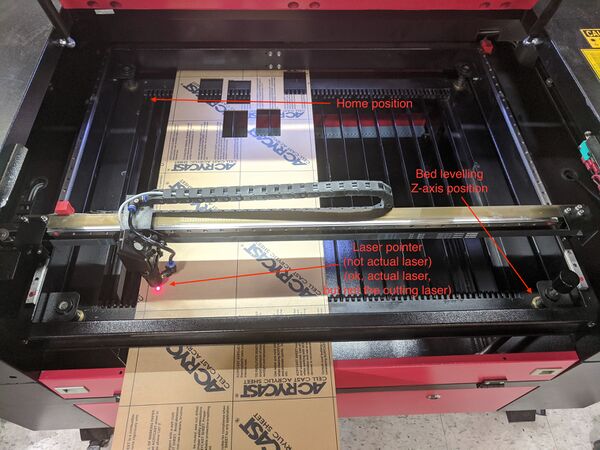
Ok, there is a lot of information in this next photo, so I'll provide details after your eyes glaze over.
- Home position: This is where the laser will return to when you tell it to home.
- Laser pointer: This is where actual cutting happens. There is a positioning LED that is shining, but it is not the cutting laser.
- Z-axis knob: This system has manual bed leveling, and you'll use this to position the laser focus.
Focus the laser
The process for focusing the laser is the same for both lasers, the only difference is that you do it using the LaserCut 5.3 software on the PewPew9000 and you use the manual knob on this one.
Dump for notes
- Manual z
- LightBurn
Logs
Please, log your work. This is important to understand maintenance needs, as well as building a database of materials and power/speed settings to make figuring out settings easier.


