Mold Making and Casting: Difference between revisions
Jump to navigation
Jump to search
No edit summary |
|||
| (7 intermediate revisions by the same user not shown) | |||
| Line 65: | Line 65: | ||
</gallery> | </gallery> | ||
= Magnet Models = | = Magnet Models = | ||
== Models == | |||
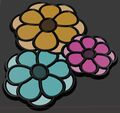
Shown with example paint schemes. | |||
<gallery> | |||
File:Casting model az state with flag.jpg | |||
File:Casting model flowers 01.jpg | |||
File:Casting model monkey 01.jpg | |||
File:Casting model unicorn 01.jpg | |||
File:Casting model progress flag 02.jpg | |||
</gallery> | |||
== Suggestions == | == Suggestions == | ||
* Cactus | * Cactus | ||
* HSL meatball on AZ shape (with rays and blue?) | * HSL meatball on AZ shape (with rays and blue?) | ||
* Flower | |||
* Mandala | |||
* Dinosaur | |||
* Earth | |||
* Darwin Fish | |||
== Basic Process == | == Basic Process == | ||
Mars 1 Bed Size: 68mm x 120mm | Mars 1 Bed Size: 68mm x 120mm | ||
| Line 89: | Line 104: | ||
# Scale the image to smaller than printer bed size (portrait or landscape). | # Scale the image to smaller than printer bed size (portrait or landscape). | ||
# Convert to Mesh | # Convert to Mesh | ||
#* If your design has a lot of lines parallel to the X axis, rotate it 45 degrees before converting. Convert to Mesh has trouble with lines aligned with the X axis. | |||
# Edit Mode > Vertices > Select All > x > Limited Dissolve > 1 degree | # Edit Mode > Vertices > Select All > x > Limited Dissolve > 1 degree | ||
# Clean Up Excessive Vertices | # Clean Up Excessive Vertices | ||
Latest revision as of 00:44, 21 April 2024
Resources
Local Services
- Reynolds, Silicone and More, Retail:
- Reynolds is national, with a retail store in Tempe, just North of the 202, off McClintock
- https://www.reynoldsam.com/location/phoenix/
Tutorials
- British Man makes Silicone Molds for Pewter Models
- 1) Mold Making: https://www.youtube.com/watch?v=h_QD1ff3wJk
- 2) Casting: https://www.youtube.com/watch?v=7atJo0iA5W4
- Ex Disney Guy Casting Urethane Resin in Silicone
- Playlist: https://www.youtube.com/playlist?list=PLIy8UDigJ_ynP97e0sMtbKmRuBrCff1Ql
- Same Guy, Doing Low-Temp Metal: https://www.youtube.com/watch?v=wRU-IlIBPKY
- Casting a mechanical part in low-temperature bismuth-tin:
- Lost Styrofoam
- Electroplating
- https://www.youtube.com/watch?v=G-PtnwtOR24
- I haven't tried this on bismuth tin yet.
- Desktop Injection Molder
- Resin Printing for Beginners
Materials
- High Temperature 3D Printer Resin (for directly printing molds)
- 250C, $2.15/oz: https://www.amazon.com/dp/B08V8T9NZL
- 180C, $1.15/oz: https://www.amazon.com/dp/B08GJTGPYQ
- Eutectic Bismuth Tin
- 58% Bi 42% Sn by weight
- 138C melting point (280F)
- 150C / 300F casting
- Tin (Sn) 232C / 450F
- Bismuth (Bi) 272C / 521F
- Bi-Sn tensile strength: 55 MPa, Mild Steel (the cheap stuff): 400-550 MPa, 6061 Aluminum (the cheap stuff): 290 MPa, Tin 220, 3003 aluminum: 186, HDPE plastic 20 - 30, epoxy resin 26 - 85
- Bi-Sn Density: ~8,500 kg/cm3, Mild Steel: 7,850 kg/cm3
- A little denser than steel and a lot weaker than most metal.
- Roughly as strong as epoxy resin (which can be cast in the same molds and is less dense).
- Heat Stable Silicone Mold Release
- Cheaper Tin and Bismuth (free shipping over $150):
Equipment
- Elegoo Mars 1
- 4.7x2.6x6.1 = 120x68x155
Examples
Progress Flag
Magnet Models
Models
Shown with example paint schemes.
Suggestions
- Cactus
- HSL meatball on AZ shape (with rays and blue?)
- Flower
- Mandala
- Dinosaur
- Earth
- Darwin Fish
Basic Process
Mars 1 Bed Size: 68mm x 120mm
- Create a clip art style image in Inkscape.
- I use layers as my checkpoint stack, so I can recover to a previous checkpoint if needed.
- Draw outlines only.
- Use Bezier curves and straight lines.
- Minimize the number of control handles to get fair curves.
- File > Document Properties > Page > Custom Size: printer bed size or smaller (portrait or landscape).
- Set the line width to 0.5mm.
- Set line ends to rounded.
- Keep inset regions at least 2mm wide.
- Clean up everything as much as possible.
- Check where endpoints meet other curves. Close gaps, pull in dangling ends.
- Path > Stroke to Path
- Select 1 path, then all the rest, then Path -> Union
- Save as SVG
- Import Into Blender
- Set Scene > Units > Length to Millimeters
- Scale the image to smaller than printer bed size (portrait or landscape).
- Convert to Mesh
- If your design has a lot of lines parallel to the X axis, rotate it 45 degrees before converting. Convert to Mesh has trouble with lines aligned with the X axis.
- Edit Mode > Vertices > Select All > x > Limited Dissolve > 1 degree
- Clean Up Excessive Vertices
- Loop Select, Remove Critical Vertices, Dissolve by Distance 0.1m or 0.2m
- Pay Special Attention to Inside Corner Vertices
- Merge vertices at center or dissolve vertices as needed.
- Loop Select and Create Face
- Inset by 0.5mm
- Clean Up Corners
- Select Inset Face
- Select More
- Unselect Inset Face
- Triangulate Faces
- Select Inset Face
- g > z > 0.7 > - (move face 0.7mm in the negative z direction)


